|
|
|
||
You should make JavaScript available to read this page.
Please enable the execution of JavaScript!

【Kinect Sensorを利用して拡張現実センサを作る試み】 |
||

|
【リンクフリー】 私設研究所ネオテックラボ Neo-Tech-Lab.co.uk 【記載者】 【私設研究所Neo-Tech-Lab】 上田 智章 |
作成日 2011/01/08 更新 2011/04/03 最終更新 2011/05/06 |
ここにチェックボックス型外部コンテンツ・メニューが入ります。 | ||
|
|
|
||
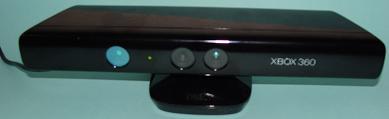 【写真1】Microsoft社のXBOX 360用モーションキャプチャーKinect Sensor
 |
【はじめに】本来見ることができない物理量を3次元的に可視化する拡張現実センサを実現する手段のひとつとして、Microsoft社のXBOX 360用モーションキャプチャーKinect Sensorに着目し、あれこれ試作を繰り返しています。このページでは、高周波磁界分布や超音波を3次元的に可視化する拡張現実センサを例に挙げてKinect Sensorの使い方を説明します。 |
【Kinectのデプスカメラを自作してみた】3次元デジタイザや3次元スキャナという言葉の方がふさわしいとも思えるデプスカメラの動作原理の検証を行う目的で自作にトライしました。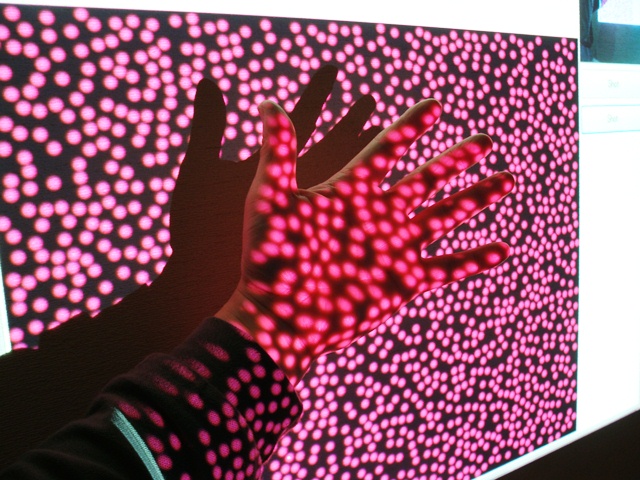 【Photo】試作中のデプスカメラでの実験風景(Kinect方式に近いモード) 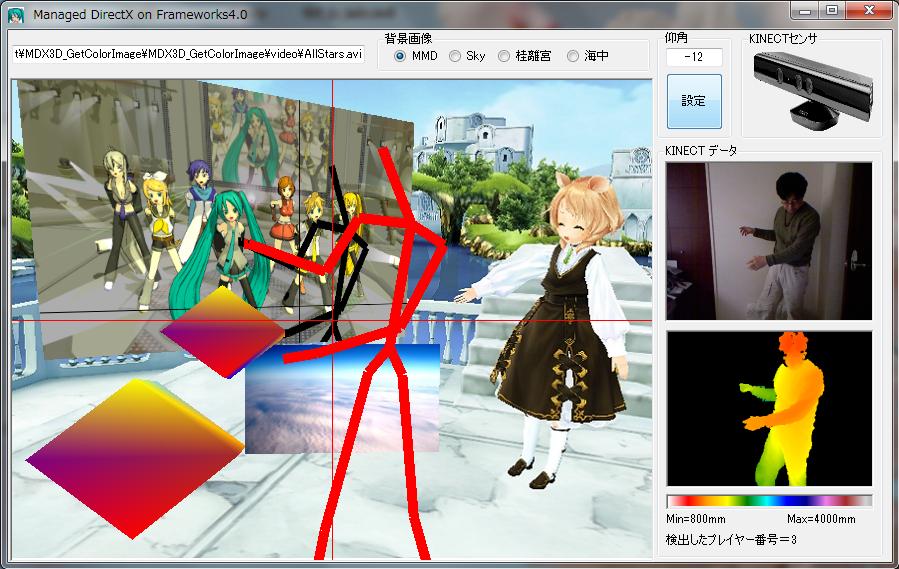 【Fig.1】試作中のSkeletonCaptureのDirectX版 (Frameworks4.0+Managed DirectX+KINECT) 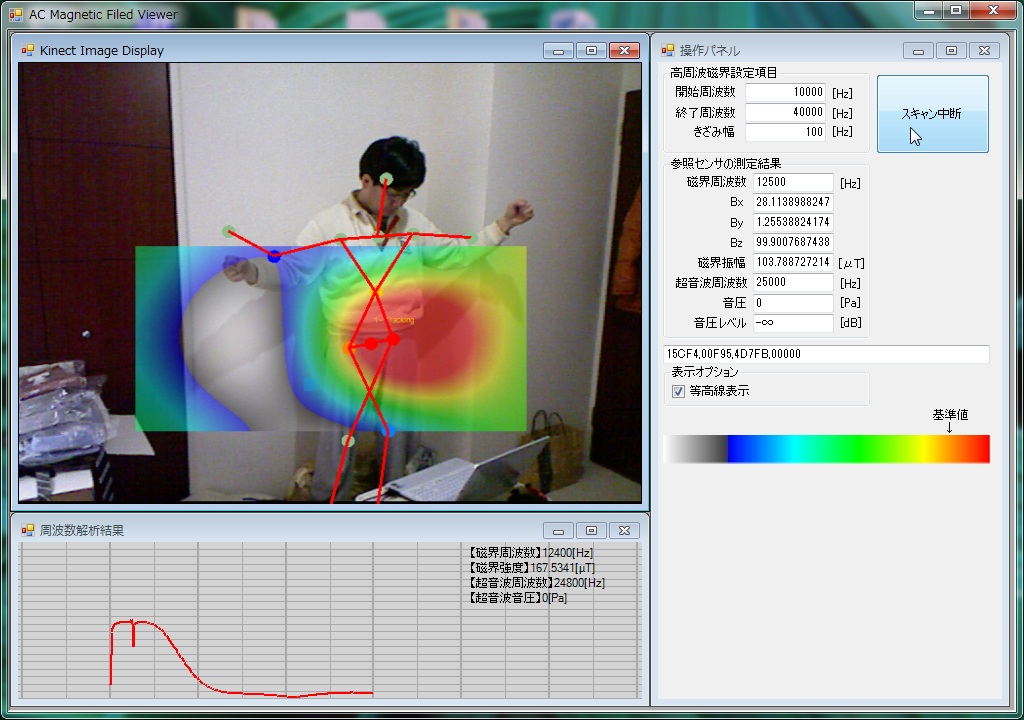 【Fig.2】試作中の高周波磁界分布可視化拡張現実センサ 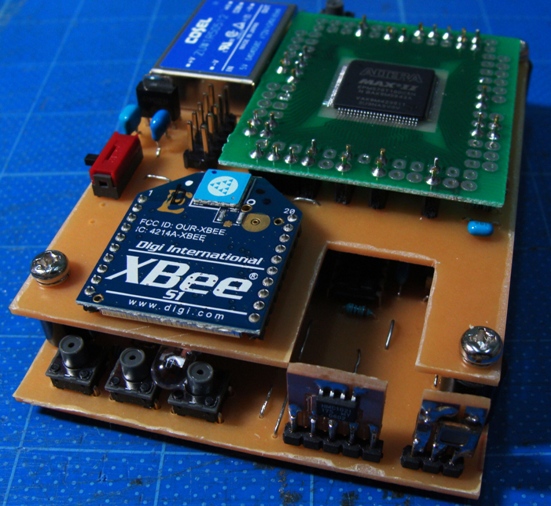 【Photo1】試作中のワイヤレス高周波磁界・超音波センサ 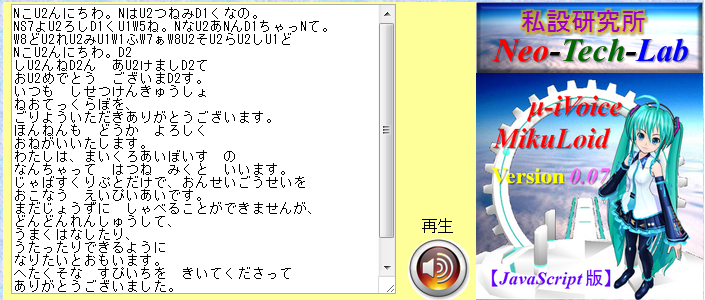 【Fig.3】JavaScript音声合成エンジン『μ-iVoice』の表示例 |
【目次】【Kinectのデプスカメラを自作する】●Kinectのモーションキャプチャの機能を実現する上で最も重要な要素が赤外線プロジェクタと赤外線カメラで構成されるデプスカメラです。一体どのような動作原理で各画素の深度(Z値)を測定しているのか興味を持ったので自作してみました。実際には現在3通りを試作していますが、それぞれ説明が煩雑になってしまうので、Kinect方式に最も近いと考えられる方式のみ記述します。現在演算負荷を1000分の1以下に圧縮する方法に関して取り組んでいます。本年7月中旬から9月頃までに記事を充実させる予定です。●【KINECTのデプスカメラの動作原理について】 ■【米国特許庁の簡易特許検索サービス】 ■【Google Patent検索サービス(β版)】 ■【デプスカメラの構造】 ■【プロジェクタの構造】 ■【YouTubeで見かけたKinectのランダムドットパターン】 ■【ランダムドットパターンの作成】 ■【部分パターンのX方向のシフト量で深度(Z)がわかる】 ●【デプスカメラを自作するプロジェクト】 ■【レーザーポインタとUSBカメラで測距】 ■【ランダムドット方式デプスカメラの試作】 ■【Prime Sense社の発明の請求の範囲】 【Kinect for Windows SDK Version1.5】●2012年5月21日、Microsoft社がKinect for Windows SDKのVersion1.5の配布を開始しました。★Microsoft.Kinectの参照を取り直せば、Version1のサンプルソフトウェアは動作します。 ■座位骨格追尾モードが追加されました。上体の10関節だけの追尾が可能です。 ■顔追尾が追加されました。 ■Speech音声認識/音声合成で日本語が追加可能になりました。 【日本語ハルカ 音声合成/音声認識サンプル】 【Kinect for Windows SDK Version1導入編】⇒ 【English Version】●2012年2月1日、遂にMicrosoft社が正式にKinect for Windows SDKのVersion1の配布を開始しました。 どうやら、PC接続専用センサのKinect for Windows向けらしいのですが、筆者が確認したところ、XBOX360用センサをPCで動作させることができました。 Colorイメージ、Depth情報、Skelton(骨格)情報の取得だけでなく、音源方向の検出、音声の.wavファイル形式での録音、音声認識エンジンSpeechの実装、センサの上下角の遠隔操作などもXBOX360用センサで問題なく行うことができました。 使う事のできなかった機能はnear(近接)モード[400mm~3000mm]だけでした。 英語ですが、各機能の使い方の解説ドキュメントが付いています。目的別に非常に丁寧な文章で解説されています。 注意すべき点は1点だけで、SkeletonStreamをenableにしないと、Depth値のPlayerIDが有効にならないことくらいです。 ●骨格抽出、残像表示までの簡単なサンプルプログラムを目的別にプロジェクトファイルごと公開しています。 KINECT導入編を参考にしてください。/2012/02/16/ ●【KINECT for Windows SDK Version1インストール】 ●【KINECTセンサの特徴】 ●【Visual C# サンプルプログラム集】 ①Bitmap_GetColorImage.zip【カラー画像取得】 ②Bitmap_GetDepthImage.zip【デプス情報/画像取得】 ③Bitmap_GetPlayerDepthImage.zip【人物の切出し(デプス)】 ④Bitmap_GetPlayerColorImage.zip【人物の切出し(カラー)】 ⑤Bitmap_GetSkeletonData.zip【骨格情報取得】 ⑥Bitmap_GetSkeletonAfterimage.zip【骨格追尾残像表示】 その他、CircleDetect, Gesture, Cyber Eye等を随時追加の予定。 ●【KINECT SDK導入時に予想されるトラブル事例】 ●【Frameworks Ver.4.0でManaged DirectXを使う方法】 ●【公開予定】 ●【Kinect for Windows SDK Version1でのC#使い方概要】 ●【Kinect for Windows SDKで骨格抽出を行うサンプルプログラム】 ●【各種拡張現実センサの開発】 【OpenNI編】OpenNIは、2010年11月のKINECTセンサの発売直後のたった2ヶ月でドライバーをオープンソースで提供してくれたという業績は評価できるものではありましたが、現状、Micorosoft社が音声認識Speech APIと統合したKINECT for Windows SDKを供給してくれており、両者の機能、インストールの手間などを比較すると、もはや見劣りがする状況に陥っています。筆者は5分もあれば導入できるKINECT for Windows SDKをお勧めいたします。OpenNIをインストールする場合は導入に2時間を覚悟する必要があります。下記ドキュメントは本ページより分離いたします。 ●【Windows7でKinectを使えるようにするには?】 ●【手順1:ダウンロード】 ●【手順2:デバイスドライバのインストール】 ●【手順3:OpenNIのインストール】 ●【手順4:NITEのインストール】 ●【手順5:Sensorのインストール】 ●【手順6:環境変数の修正】 ●【手順7:OpenNI用xmlファイルの置き換え】 ●【手順8:NITE用xmlファイルの置き換え】 ●【動作確認】 ●【Kinect Sensorの使い方】 ● 【以下の項目書きかけです。】 ●【Kinect Sensorについて】 ●イスラエルのPrime Sense社のミドルウェアNITEとオープンソースOpenNI 【ARを支える他の技術】■『Kinectで拡張現実センサを構成する試み』【C#】■『Google翻訳の音声合成(Text-To-Speech: TTS)API』【JavaScript】 ■『Webで使える音声合成API μ-iVoice』【JavaScript】 変形DDS(Direct Digital Synthesizer)アルゴリズムを用いた音声合成/シンセサイザAPI(Version0.07)です。Google TTSと違ってブラウザ上で音声合成を行いますので文字数の制約はありません。簡易なスクリプトで音声に抑揚(音階、幅、強弱)をつけることができます。iframeでブログなどに埋め込めます。現状ひらがなだけですが、Version0.08で漢字への対応、自動抑揚付与などの機能追加、音質向上等の改良を予定。加えてローカルからオリジナル音声データの組み込みを可能にします。 現状、声域の狭い初音ミク風味(あまり似ていない)の音声データのみですが、今後、オリジナル公開音声データベースを構築する予定です。 |
【WebGLのページ】JavaScriptでリアルタイム3次元グラフィックスが楽しめる時代の到来までもうすぐです。現在、Google Chrome12、Mozilla FireFox5、及び開発版のSafari、Operaで使うことができます。 WebGLは、JavaScriptエンジンv8とDirectXを利用して高速化したOpenGLを融合して構成されたものです。 2011年5月に指摘されたセキュリティー問題はありますが、処理速度の高速性から利便性も高いので、将来的には普及するのではないでしょうか? ●WebGLとは? ●事前準備:利用できるウェブブラウザは? ●事前準備:FireFox5でWebGLが動作しない場合には? ●WebGLのサンプル ●WebGLのデモ ●クロスドメインテクスチャーを将来も利用できる方法 |
【拡張現実】KINECTが変えるセンシングの世界【トラ技8月号予告編】【ショート版】ナレーション:Google翻訳 Text-To-Speech API 日本語女性アナウンサー 後半部分に、今回はじめて公開する動画像出てきます。 現在、最終原稿を書いている最中ですが、公開中のサンプルに加え、幾つかのソースを段階的に公開予定です。 等高線図(コンターマップ: Contour Map)も要望が多いので公開します。 動画に登場するジェスチャー検出(円・円弧リアルタイム推定処理)のソースも公開する予定です。 ページの制約でどこまで今回盛り込めるかわかりませんが、 LEDマーカー方式、自作デプスカメラアルゴリズムも順次公開予定です。 |
|
【Microsoft Kinect for Windows SDK Version1導入編】 |
|
【KINECT for Windows SDK Version1インストール】■■■記載日2012年02月09日■■■21:28頃記載【Microsoft社からKinect for Windows SDK Version1が正式に発表されています】2012年02月01日(米国時間)にMicrosoft社がKinect for Windows SDK Version1の配布を開始しました。リンク先のページに中央下にある『GET STARTED>』というリンクからダウンロードページに遷移します。 現在の所、このSDKはWindows7専用です。Version1はβ版と全く別物になっていますが、わかりやすい構造で、ドキュメントも付いています。 Microsoft社のページによれば、このSDK Version1は、予約受付中のハードウェア『Kinect for Windows』というPC接続専用のKinectセンサ用と記載されていますが、 筆者が試してみたところ、XBOX360用のKinectセンサでもちゃんと使うことができました。 インストールは超簡単です。許諾条件に同意してクリックするだけです。 5分もかからずインストールを完了させることができます。 C#, Visual Basic等の.net系に対応しています。 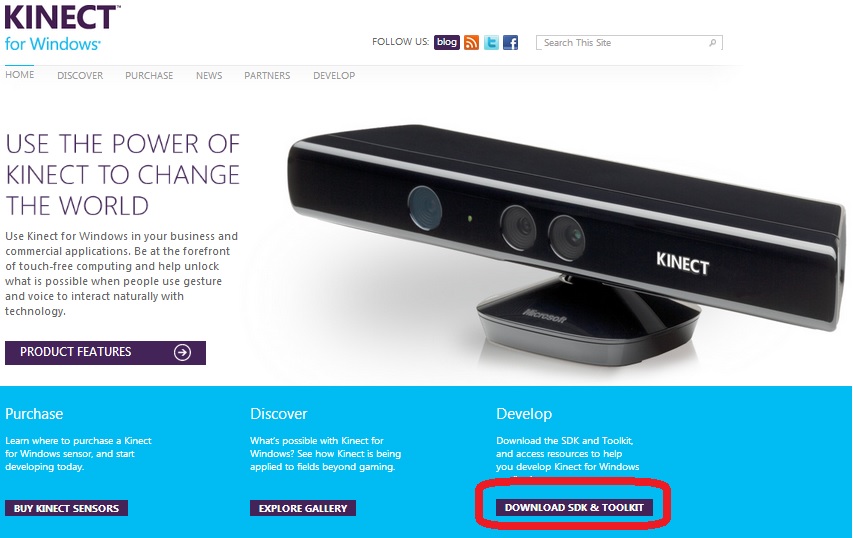 ⇒ ⇒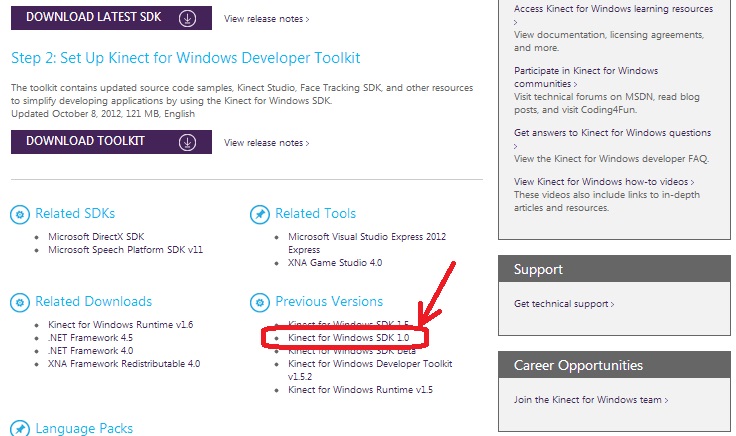 ⇒ ⇒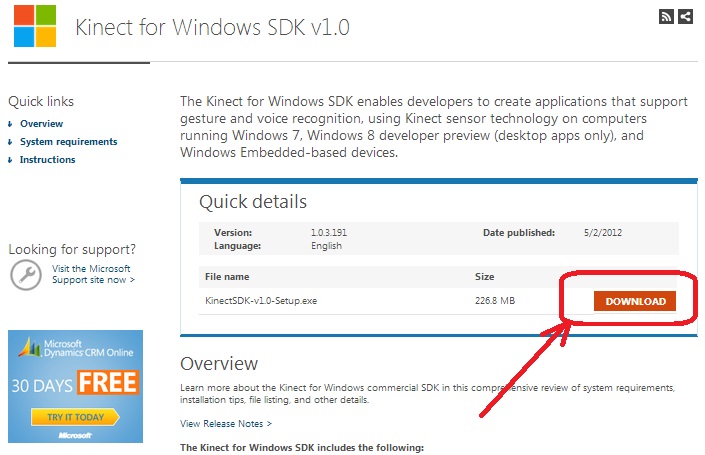 【KINECTセンサの特徴】【センサの上下角を遠隔操作できる電動チルト】C#のデモプログラムで驚いたのは、センサ本体がなんと電動チルトするじゃあありませんか。(笑)XBOX360を持っている人には当たり前なのかもしれませんが、OpenNIやKinect for Windows SDKβでは現れない機能だったので、びっくりしました。 そうかこんな機能が付いていたのかと。 KinectSensorのpropertyに読出し専用のMaxElevationAngle、MinElevationAngleがあり、その範囲の値をElevationAngleにセットするだけで動きます。 使いだすととても重宝する機能です。 【音声認識】Speech言語は英語に限定されるようですが、Speechという音声認識の機能も使えるようになっています。サンプルプログラムでは、red(赤), green(緑), blue(青)の3色を認識するように記述してありましたが、 Choiceを勝手に追加してみたところ、white, black, pink等の色だけでなく、Japanとかの単語もちゃんと認識させることができました。 これで、start, stop等の音声でセンサを制御することが可能になりそうですね。この機能は期待できます。 いちいち離れたパソコンまでクリックしに戻らなくてもいいですから。これは使える機能ですね。 でも、正しい英語の発音でないと動作しませんけどね。 正しい英語の発音が勉強できていいとも言えます。 将来的には英会話学校に通う必要が無くなるかもしれません。 【音源方向検出機能】内蔵マイクアレイで、音源の方向を検出する機能があり動作します。【感想】XBOX360用Kinectセンサで問題なく、動作するようです。PC専用のKinect for Windowsは予定価格24,800円。対してXBOX360用は14,800円。 1万円の差額には謎があります。 Colorイメージ、Depthイメージ、骨格情報抽出だけでなく、 電動チルト、音声認識(Speech)、音源方向検出、音声記録などはXBOX360用でも動作しました。 KINECT for Windowsでは、KINECT for XBOX360に無かった機能としては1点だけが異なります。 従来は800mm~4000mmだった測定レンジ(default)に、nearモードが追加されているようです。 範囲は400mm~3000mmだそうです。XBOX360用ではこのモードは使う事ができませんでした。 つまり、1万円の価格差の機能上の違いはNearモードのみということになります。 ううん。謎だ。これだけの機能が動作する現状ではPC用を購入するメリットを感じられない。 まあでも、Nearモードは、表情キャプチャをつくろうと思う人には必須の機能なので、 これは使う人によって価値観が大きく異なる問題という事でお茶を濁しておこうかと思います。 試していませんが、開発段階(SDK)ではXBOX360が使えますが、 ディストリビューション(エンドユーザー)では使えないと英文ドキュメントには書かれています。 IDで判断することが簡単にできますから。仮に今使えても、将来使えなくなる可能性もあります。 ところで、パソコンに要求される性能ですが、 125mS毎のスクリーンキャプチャとサウンドレコーダーで記録しながら動画作成をしようとすると CORE i3だとちょっと処理能力が不足気味なので、i5, i7クラスがお薦めです。 【Visual C# サンプルプログラム集】【Visual C#】【Bitmap版サンプル】①Bitmap_GetColorImage.zipカラー画像をキャプチャーして表示する。 ②Bitmap_GetDepthImage.zip デプス情報を読み込んでカラールックアップテーブルで色を付けて表示する。 ③Bitmap_GetPlayerDepthImage.zip デプス情報のPlayerID(LSB3bit)を使って人物部分だけ切り出す。 PlayerIDが有効になるのは、SkeletonStreamが有効の場合に限られるので注意が必要。 ④Bitmap_GetPlayerColorImage.zip デプス情報のPlayerID(LSB3bit)を使って人物部分だけ切り出す。 カラー画像とデプス画像の位置ズレを補正して、カラー画像の人物部分だけを切り出す。 矩形図形間のテクスチャーマッピングを行って位置ズレ補正を行う。  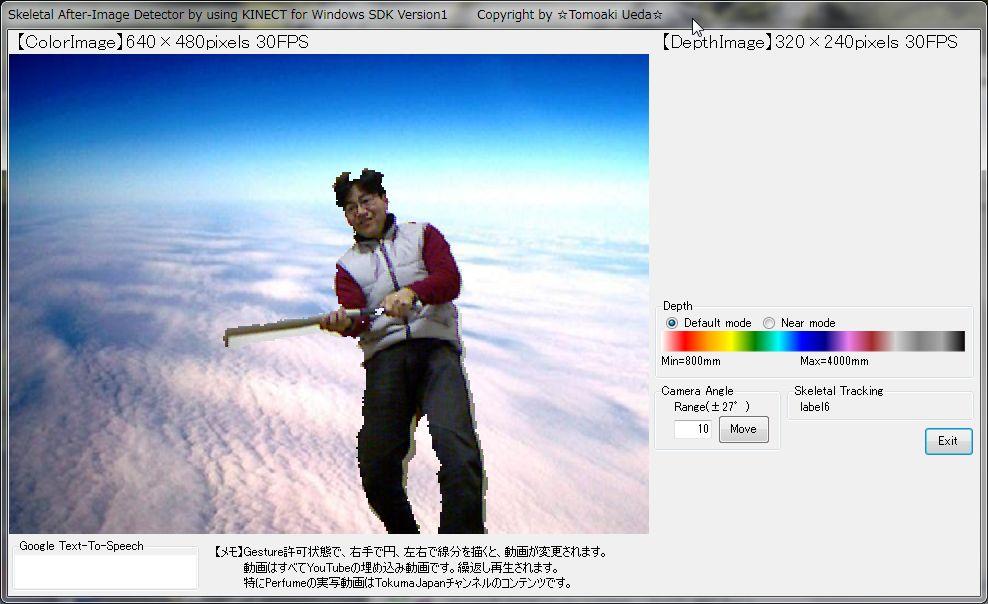 【人物の切り出しと写真やCGへの重畳表示】Version0.01 (TVのクロマキーのようなイメージです。) ⑤Bitmap_GetSkeletonData.zip 骨格情報の履歴を格納して両手の残像をカラー画像上に重畳表示する。 ⑥Bitmap_GetSkeletonAfterimage.zip 両手先のSkeletonPointの残像を表示する。 ⑦【7月中旬】Bitmap_DetectCircleArc ⑧【7月中旬】Bitmap_DetectBasicGesture ⑩【7月中旬】Bitmap_CyberBoard 【Visual C#】【Managed DirectX版サンプル】①【7月中旬】BoneTracking②【7月中旬】CyberEye 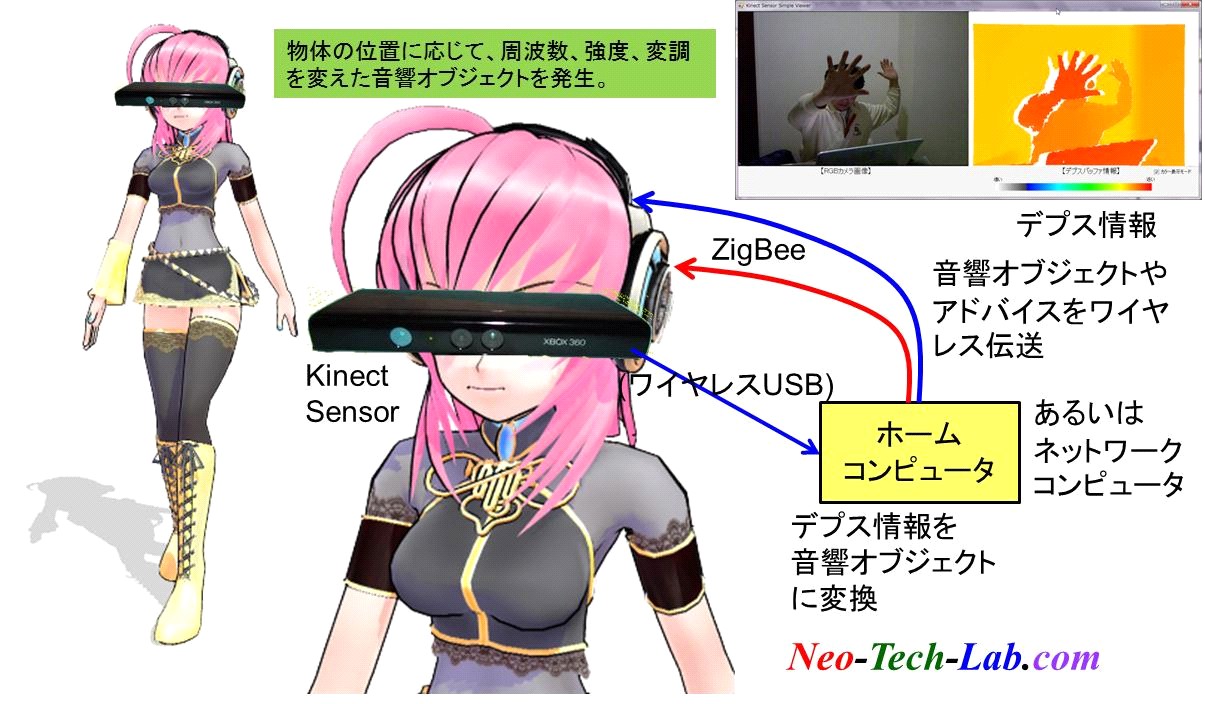 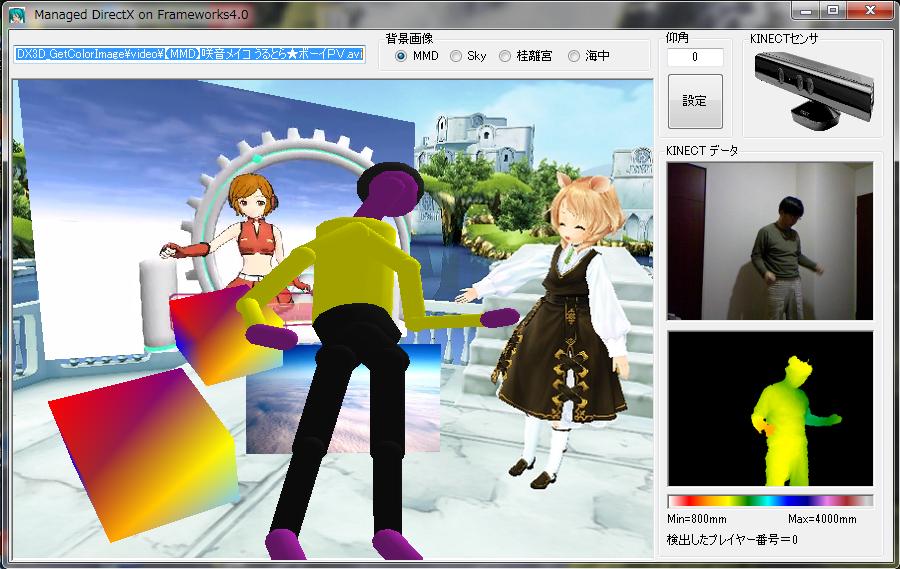 【Cyber Eye】Depth情報を音響オブジェクトに変換する代替視覚システム 【Bone Tracking】[現在Managed DirectXで動作検証中] [企画案段階]イタリアのグループの物より高性能なものを目指します。 要するにデプスバッファからデプス値を読み込んで大まかな3次元格子 単位で、周波数、位相(遅延時間)、振幅、音色等を変えた音源をミックス する仕掛けです。将来的には人間の頭部インパルス応答関数(頭部表面の 反射)も考慮して立体音響オブジェクトを作る予定です。 【KINECTデモ用】【Google音声合成Text-To-Speechの使い方サンプル】①GoogleTTS.zip②Browser.zip 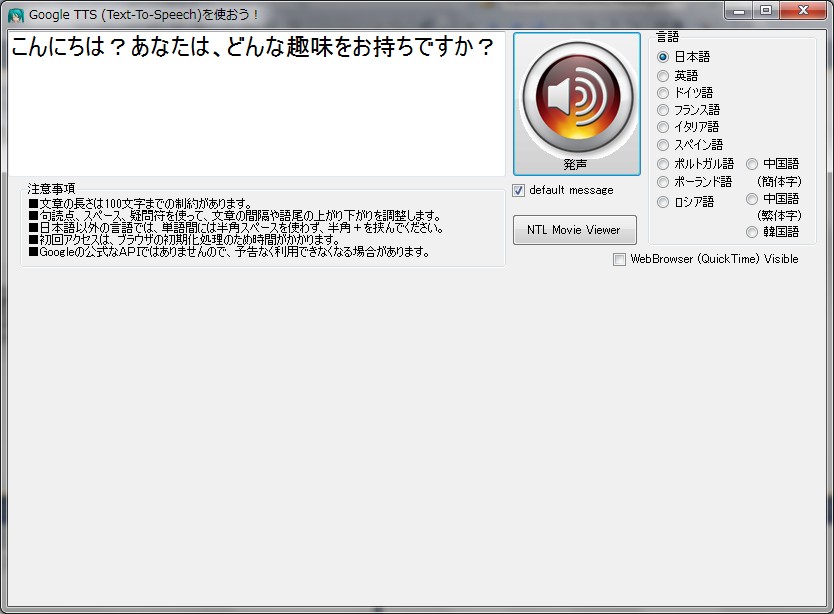 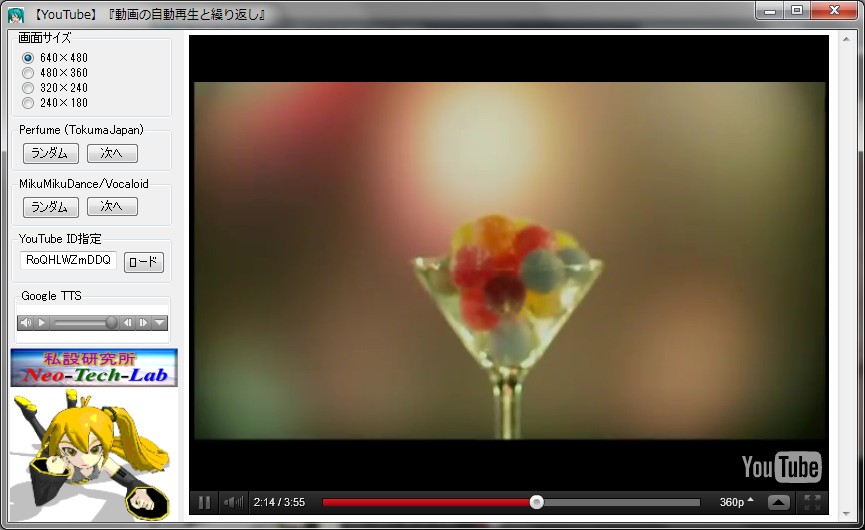 サンプルプログラムをDirectX向けに書きなおす予定です。少々お待ち下さい。 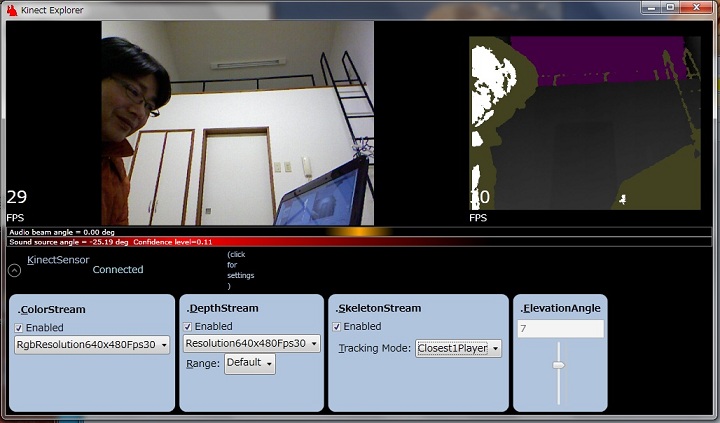 【KINECT SDK導入時に予想されるトラブル事例】【導入時にありそうなトラブルの事例】【MSVCR100.dllが見つからないというエラー】もし、そんなエラーメッセージが出てしまったら.....迷わず、Visual C++をインストールするか、Microsoft Visual C++ 2010 Redistributable Package (x86)をインストールしましょう。 ついでに、MicrosoftのDirectX End User Runtimeもインストールしておけば安心です。 以下、いきさつに関するメモをコピーしておきます。 【MMDへのKinect導入トラブル対応から】 【質問】(オーストラリア) OK I did all you told me to and these are the errors The Program can't start because MSVCR100.dll is missing from your computer. Try reinstalling the program to fix this problem. (This also happened when I tried opening Smaple Skeletal Viewer) GetProcAddress: 126:The specified module coul not be found. Cannot move OpenNI. OpenNI mayhave failed install OpenNI導入トラブルのようでした。 Windows7またはWindows8 Preview限定ですが、OpenNIをインストールするのが困難な人のようなのでMogg氏の開発されたMoggNUIを薦めました。 ところがOpenNIと同じようにMSVCR100.dllが見つからないというエラーが出るとの事。 MSVCR100.dllはVisual c++に実装されているDLLパッケージのようなので下記のインストールを薦めました。 ついでに、DirectX9も実装されていないようだったのでダウンロードを薦めました。 【MMDへのKinect最速導入手順】もし、あなたのパソコンがWindows7なら、以下の手順をお薦めします。1. まず、下記URLからMicrosoft社のKinect for Windows SDK Version1をインストールします。 http://www.kinectforwindows.org/download/ 2. Kinect for Windows SDKのインストールが完了して再起動したら、サンプルプログラムのSkeletal Viewerを起動して動作を確認します。 3. もし、サンプルプログラムのSkeletal Viewer起動直後にMSVCR100.dllが見つからないというエラーが発生したら、それはVisual C++をインストールしていない場合だと考えられますので、Microsoft Visual C++ 2010 Redistributable Package (x86)をインストールします。 Microsoft Visual C++ 2010 Redistributable Package (x86) 4. 多分そういう場合には、DirectX9もインストールされていないと思われるので、MicrosoftのDirectX End User Runtimeもインストールしましょう。 MicrosoftのDirectX End User Runtime 5. 樋口さんのMMDダウンロードサイトからMMD最新版をダウンロードして、解凍します。 http://www.geocities.jp/higuchuu4/pict/MikuMikuDance_v739dot.zip 6. Mogg氏のサイトに行ってKinect for Windows対応のMoggNUIをダウンロードします。 https://sites.google.com/site/moggproject/ 7. 日本語ユーザーは『jaフォルダ』と下記モジュールをMMDのDataフォルダ内にコピーします。 - DxOpenNI.dll - MoggNuiConfig.exe |
【Frameworks Ver.4.0でManaged DirectXを使う方法】KINECT for WindowsはVer.4.0以降のランタイムでしか動作しないようで、今まで適当にごまかしていた、Ver.2.0で動かす方法が使えなくなった。 だからと言ってXNAじゃ困るし、使いたくない。 ちょっと苦労したのでメモ。 [1] Visual C#でFormタイプの新規プロジェクトを作成。 [2] プロジェクト(P)⇒新しい項目の追加(W)⇒『アプリケーション構成ファイル』を追加する。 これは、app.configというファイルを追加する手順だが、このファイルを以下のように書き換える。 キーワードがわからず、検索しまくったら海外の掲示板でこの方法を見つけた。 コンパイルの度に3行程『スキームが見つかりません』というようなメッセージが出るようになるが 気にする必要はない。取り敢えず、機嫌よく実行するようになった。
<?xml version="1.0" encoding="utf-8" ?>
<configuration>
  <startup useLegacyV2RuntimeActivationPolicy="true">
    <supportedRuntime version="v4.0" />
  </startup>
</configuration>
[3] プロジェクト(P)⇒参照の追加(F)で参照タブからC:\Windows\Microsoft.NET\DirectX for Managed Code\1.0.2902.0フォルダの Microsoft.DirectX.dll, Microsoft.DirectX.Direct3D.dll, Microsoft.DirectX.Direct3DX.dllを参照。 [4] プロジェクト(P)⇒参照の追加(F)で.NETタブから Microsoft.Kinectを参照。 [5] Unmanagedなこともするので、プロジェクト(P)⇒*******のプロパティーに入って ビルド・オプションのアンセーフコードの許可(F)にチェックを入れる。 [6] DirectXの表示はTopLevel.Contorolでは困るので、
D3Ddevice = PrepareD3dDevice(pictureBox1); //【DirectX初期化】
とか記述して下のようにPictureBoxに描画する。
private Device PrepareD3dDevice(Control i_window)
{


try {
   return new Device(0,
                     DeviceType.Hardware,
                     i_window.Handle,
                     fl_base | CreateFlags.HardwareVertexProcessing,
                     pp);
     }

}
【Frameworks Ver.4.0でManaged DirectXを使う例】背景画像をSurfaceに登録しておき、BackBufferにコピーして、その後で回転する立方体を描画するだけのサンプルです。実はManaged DirectXでSurfaceにキャプチャ画像をセットする方法を3通り(Stream経由、File経由等)ほど試してみたのですが、 どれもとても処理が遅いので使い物になりませんでした。(1FPSくらいしかでない。) 登録済みのSurfaceをBackBufferにコピーするのは速いが、Surfaceへの登録(CPU側からGPU側への転送)する場合には速度が遅い。 DirectShowのラッパーを作らないとやはり無理なのか? BitmapやXNAの方が速いのには参った。 3D-CGアクセラレータを作ればこんな問題は生じないのに。 将来的には今のグラフィックスでサポートされていない演算を試さなければならないがどうするか思案中。 HowToUseMDX3D.zip 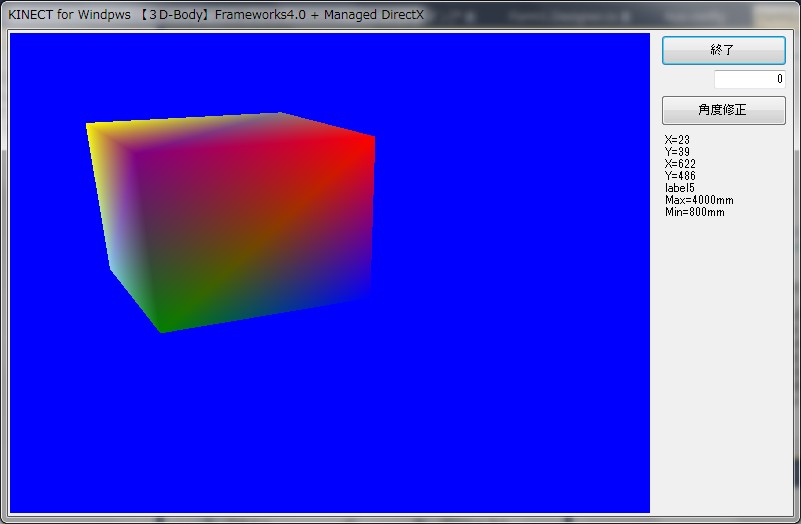 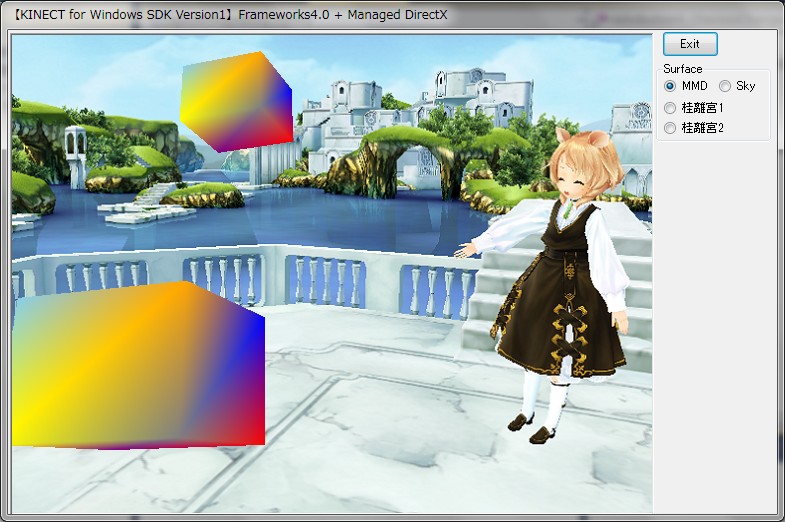 " |
【今後の公開予定】【公開予定のサンプルプログラム】7月半ば頃にサンプルや構成要素のモジュールのソース(Visual C#)を公開の予定です。現在、鋭意製作中。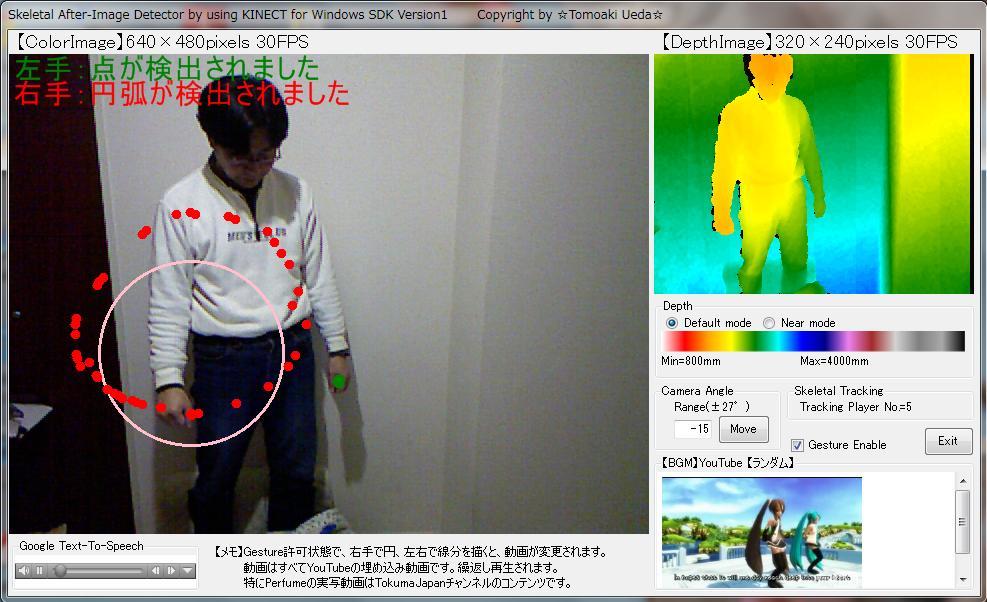 【Cyber Sign】Version0.01 基本図形のサインをリアルタイムに検出 線分以外にリアルタイムに対応するのが特徴です。 YouTube動画を切り替えるサンプル・プログラム 【コーディング予定】今後、下記、6種類を作成の予定です。●骨格抽出 :Bone Tracking (3Dモデルを動かす) ●Cyber Eye :デプス・イメージを音響オブジェクトに変換する代替視覚システム(上図参考) ●Cyber Board :GoogleTTS(音声合成)とKINECTのコラボ 英会話学習への応用例サンプル ●Cyber Sign :Gesture検出のまねごと(YouTube動画をジェスチャー検出で切り替える) ●拡張現実センサ サンプルプログラム ●KinectのColor Imageを使ったマーカー式拡張現実サンプルプログラム ARToolKitの移植ではなく、オリジナル理論で開発中。 既存Hough変換を使わない私オリジナルのBase Transition Ruleを使った方法です。   【Kinect for Windows SDK Version1でのC#使い方概要】ドキュメントに英語で記載されていますが、ちょっとだけ、使い方を記載します。英語が読める方は、How TosのKinect Explorer C#のColor Viewer C# How To, Depth Viewer C# How To, Skelton C# How Toに書かれています。 また、Record Audio C# How To, Audio Demo C# How To, Speech C# How Toに使い方が書かれているので有用な情報です。 一読をお勧めいたします。 ■利用可能なKINECTセンサを取得する
//【利用可能なKINECTセンサを取得する】
 kinectSensor = (from sensorToCheck in KinectSensor.KinectSensors where sensorToCheck.Status == KinectStatus.Connected select sensorToCheck).FirstOrDefault();
 if (kinectSensor == null)
 {
    MessageBox.Show(
       "接続可能なKINECTセンサが見当たりません。",
       "KINECT Viewer Error Message",
       MessageBoxButtons.OK
    );
    return;
 }
■Colorイメージの取得方法 1)Color Data Streamを許可する Enableで設定しているのが、RGB、640×480画素、毎秒30フレームでカラーイメージを取得する設定です。 RGB、1280×960画素、毎秒12フレームのモードもありますが、関西(60Hz圏)では照明のせいでモアレが発生します。 KinectSensor kinectSensor; kinectSensor.ColorStream.Enable(ColorImageFormat.RgbResolution640x480Fps30); kinectSensor.Start(); kinectSensor.ColorFrameReady += ColorImageReady; //【準備完了でColorImageReadyがcallされる】2)取得するColorデータ byte型でバッファを定義します。 private byte[] pixelData; this.pixelData = new byte[imageFrame.PixelDataLength];キャプチャー準備完了毎に1)で指定したColorImageReadyがcallされるので、上記バッファにデータをコピーします。
  private void ColorImageReady(object sender, ColorImageFrameReadyEventArgs e)
  {
      using (ColorImageFrame imageFrame = e.OpenColorImageFrame())
      {
          if (imageFrame != null)
          {
              imageFrame.CopyPixelDataTo(this.pixelData);
          }
          else
          {
              // imageFrame is null because the request did not arrive in time          }
      }
  }
3)Colorデータを描画(render)するWindows Presentation Foundation (WPF)の構造であるWriteableBitmap形式を定義します。 this.outputImage = new WriteableBitmap(imageFrame.Width, imageFrame.Height, 96, 96, PixelFormats.Bgr32, null); this.kinectColorImage.Source = this.outputImage;以下のように指定すれば、ColorImageFrameをWriteableBitmapにコピーして表示を更新することができます。
this.outputImage.WritePixels(new Int32Rect(0, 0, imageFrame.Width, imageFrame.Height),
    this.pixelData, imageFrame.Width * Bgr32BytesPerPixel, 0);
■Depthイメージの取得方法 1)Depth Data Streamを許可する 利用可能な分解能設定は次の3つがあります。 Resolution320x240Fps30 Resolution640x480Fps30 Resolution80x60Fps30
KinectSensor kinectSensor;
kinectSensor.DepthStream.Enable(DepthImageFormat.Resolution320x240Fps30);
kinectSensor.Start();
kinectSensor.DepthFrameReady += new EventHandler
2)取得するDepthデータ深さ(距離)情報を取得する目的のshort型バッファとスクリーン表示用のbyte型バッファを定義します。
  private short[] pixelData;
  private byte[] depthFrame32;

  pixelData = new short[imageFrame.PixelDataLength];
  depthFrame32 = new byte[imageFrame.Width * imageFrame.Height * 4];
取得可能状態になると、1)で指定したDepthImageReadyがcallされます。
  private void DepthImageReady(object sender, DepthImageFrameReadyEventArgs e)
  {
      using (DepthImageFrame imageFrame = e.OpenDepthImageFrame())
      {
          if (imageFrame != null)
          {
              imageFrame.CopyPixelDataTo(this.pixelData);
          }
          else
          {
              // imageFrame is null because the request did not arrive in time
          }
      }
  }
3)Depth(距離)データの形式をスクリーン表示用データに変換する
この変換で、16bitの距離情報に、プレーヤー毎に異なる色を与え、表示用の変換をワンタッチで変換してしまいます。byte[] convertedDepthBits = this.ConvertDepthFrame(this.pixelData, ((KinectSensor)sender).DepthStream);4)Depthデータの描画 WPFのWriteableBitmap形式への変換フォーマットを指定します。
KinectDepthViewer kinectDepthImage;
WriteableBitmap   outputImage;

this.outputImage = new WriteableBitmap(imageFrame.Width, imageFrame.Height, 96, 96,
PixelFormats.Bgr32, null);

this.kinectDepthImage.Source = this.outputImage;
次の行の実行でイメージが更新されます。this.outputImage.WritePixels(new Int32Rect(0, 0, imageFrame.Width, imageFrame.Height), this.pixelData, imageFrame.Width * Bgr32BytesPerPixel, 0);   ■Skeltonデータの取得方法 ColorイメージやDepth情報取得と類似のコードの記述方法が、Skelton C# How Toに記載されています。 ■Audioの記録方法 .wavファイル形式ファイルへの記録方法が、Record Audio C# How Toに記載されています。 ■音声認識エンジンの使い方 Audio Demo C# How ToやSpeech C# How Toにコードの記述方法が書かれています。 |
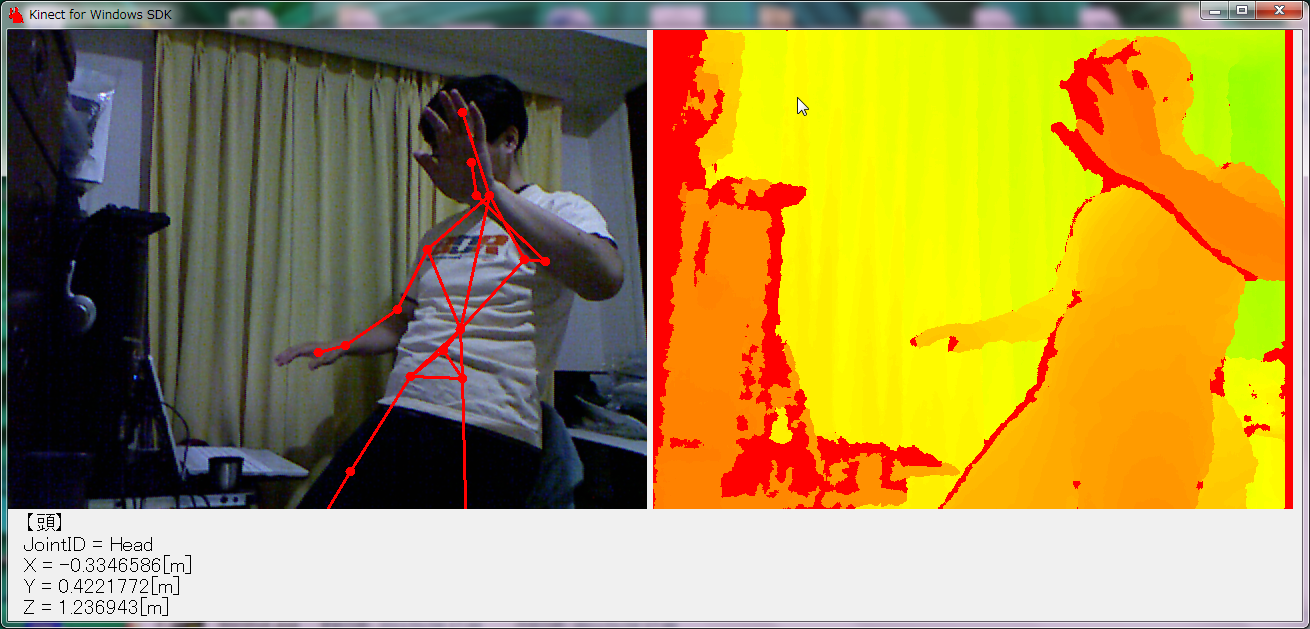
【Kinect for Windows SDKで骨格抽出を行うサンプルプログラム】Kinect for Windows SDK Version1を使って骨格抽出を行う場合のサンプル・プログラムを例示します。●骨格抽出サンプル(Kinect for Windows SDK Version1版) Formの部分だけを以下に示します。 一からFormコードを記述する場合には、まずMicrosoft.Kinectを参照追加する必要があります。 プロジェクト(P)⇒参照の追加(F)⇒.NETタブ⇒Microsoft.Kinectを選択 で参照を追加することができます。 短時間のやっつけで作成したので細かなところは気にしないでください。 特に、Skeltonのところは動かしただけのめちゃくちゃです。  |
|
using System;
using System.Collections.Generic;
using System.ComponentModel;
using System.Data;
using System.Drawing;
using System.Drawing.Imaging;
using System.Drawing.Drawing2D;
using System.Runtime.InteropServices;
using System.Linq;
using System.Text;
using System.Windows.Forms;
using System.Threading;
using Microsoft.Kinect;           //【参照設定】プロジェクト(P)⇒参照の追加(F)⇒.NETタブ⇒Microsoft.Kinectを選択
using Microsoft.DirectX.Direct3D; //【参照設定】プロジェクト(P)⇒参照の追加(F)⇒参照タブ
//【ディレクトリ】C:\Windows\Microsoft.NET\DirectX for Managed Code\1.0.2902.0\
//【選択dll】Microsoft.DirectX.dll, Microsoft.DirectX.Direct3D.dll, Microsoft.DirectX.Direct3DX.dll

namespace KinectTest
{
    public partial class Form1 : Form
    {
        private KinectSensor kinectSensor;
        private ColorImageFrame imageFrame;  //【KINECTのColorImage】
        private DepthImageFrame depthFrame;  //【KINECTのDepthImage】
        private SkeletonFrame skeletonFrame; //【KINECTのSkeletonFrame】
        private byte[] pixelData;        //【データ受取り用】32bit
        private short[] depthData;       //【データ受取り用】16bit
        private byte[] depthFrame32;     //【カラー表示用】
        private Skeleton[] skeletonData; //【データ受取り用】
        private Bitmap bmp1; //【ColorImage表示用Bitmapオブジェクト】
        private Bitmap bmp2; //【DepthImage表示用Bitmapオブジェクト】
        private BitmapData data1; //【ColorImage用BitmapData】
        private BitmapData data2; //【DepthImage用BitmapData】
        private Rectangle rect1;  //【ColorImage用枠】
        private Rectangle rect2;  //【DepthImage用枠】
        private Thread processThread; //【MainLoop用Thread】
        private bool processRun;      //Thread実行フラグ
        private int bmsk = DepthImageFrame.PlayerIndexBitmask;
        private int bwd = DepthImageFrame.PlayerIndexBitmaskWidth;
        private int Lmax; //【測定可能最大距離】
        private int Lmin; //【測定可能最短距離】
        private Joint[] pos = new Joint[20];
        private ColorImagePoint[] pix = new ColorImagePoint[20];
        private int flagFlip=1; //【reverse】左右反転フラグ

        private Color[] colors = { Color.Red, Color.Blue, Color.ForestGreen, Color.Yellow, Color.Orange, Color.Purple, Color.White };
        private Color[] anticolors = { Color.Green, Color.Orange, Color.Red, Color.Purple, Color.Blue, Color.Yellow, Color.Black };
        private int ncolors = 6;

        //【カラーインデックスデータ】A/Dコンバータの計測値に対応する球体表示色を与える配列
        public static Int16 nColors = 256;
        public static int[] ColorLookupTable = new int[] {
         0x00FFFFFF, 0x00FBFBFB, 0x00F7F7F7, 0x00F3F3F3, 0x00EFEFEF, 0x00EBEBEB, 0x00E7E7E7, 0x00E4E4E4, 0x00E0E0E0, 0x00DCDCDC,
         0x00D8D8D8, 0x00D4D4D4, 0x00D0D0D0, 0x00CCCCCC, 0x00C8C8C8, 0x00C4C4C4, 0x00C0C0C0, 0x00BCBCBC, 0x00B8B8B8, 0x00B4B4B4,
         0x00B1B1B1, 0x00ADADAD, 0x00A9A9A9, 0x00A5A5A5, 0x00A1A1A1, 0x009D9D9D, 0x00999999, 0x00959595, 0x00919191, 0x008D8D8D,
         0x00898989, 0x00858585, 0x00828282, 0x007E7E7E, 0x007A7A7A, 0x00767676, 0x00727272, 0x006E6E6E, 0x006A6A6A, 0x00666666,
         0x00626262, 0x005E5E5E, 0x005A5A5A, 0x00565656, 0x00525252, 0x004F4F4F, 0x004B4B4B, 0x00474747, 0x00434343, 0x003F3F3F,
         0x003B3B3B, 0x000000FF, 0x000005FF, 0x00000AFF, 0x00000FFF, 0x000014FF, 0x000019FF, 0x00001EFF, 0x000023FF, 0x000028FF,
         0x00002DFF, 0x000032FF, 0x000037FF, 0x00003CFF, 0x000041FF, 0x000046FF, 0x00004BFF, 0x000050FF, 0x000055FF, 0x00005AFF,
         0x00005FFF, 0x000064FF, 0x000069FF, 0x00006EFF, 0x000073FF, 0x000078FF, 0x00007DFF, 0x000082FF, 0x000087FF, 0x00008CFF,
         0x000091FF, 0x000096FF, 0x00009BFF, 0x0000A0FF, 0x0000A5FF, 0x0000AAFF, 0x0000AFFF, 0x0000B4FF, 0x0000B9FF, 0x0000BEFF,
         0x0000C3FF, 0x0000C8FF, 0x0000CDFF, 0x0000D2FF, 0x0000D7FF, 0x0000DCFF, 0x0000E1FF, 0x0000E6FF, 0x0000EBFF, 0x0000F0FF,
         0x0000F5FF, 0x0000FAFF, 0x0000FFFF, 0x0000FFFA, 0x0000FFF5, 0x0000FFF0, 0x0000FFEB, 0x0000FFE6, 0x0000FFE1, 0x0000FFDC,
         0x0000FFD7, 0x0000FFD2, 0x0000FFCD, 0x0000FFC8, 0x0000FFC3, 0x0000FFBE, 0x0000FFB9, 0x0000FFB4, 0x0000FFAF, 0x0000FFAA,
         0x0000FFA5, 0x0000FFA0, 0x0000FF9B, 0x0000FF96, 0x0000FF91, 0x0000FF8C, 0x0000FF87, 0x0000FF82, 0x0000FF7D, 0x0000FF78,
         0x0000FF73, 0x0000FF6E, 0x0000FF69, 0x0000FF64, 0x0000FF5F, 0x0000FF5A, 0x0000FF55, 0x0000FF50, 0x0000FF4B, 0x0000FF46,
         0x0000FF41, 0x0000FF3C, 0x0000FF37, 0x0000FF32, 0x0000FF2D, 0x0000FF28, 0x0000FF23, 0x0000FF1E, 0x0000FF19, 0x0000FF14,
         0x0000FF0F, 0x0000FF0A, 0x0000FF05, 0x0000FF00, 0x0005FF00, 0x000AFF00, 0x000FFF00, 0x0014FF00, 0x0019FF00, 0x001EFF00,
         0x0023FF00, 0x0028FF00, 0x002DFF00, 0x0032FF00, 0x0037FF00, 0x003CFF00, 0x0041FF00, 0x0046FF00, 0x004BFF00, 0x0050FF00,
         0x0055FF00, 0x005AFF00, 0x005FFF00, 0x0064FF00, 0x0069FF00, 0x006EFF00, 0x0073FF00, 0x0078FF00, 0x007DFF00, 0x0082FF00,
         0x0087FF00, 0x008CFF00, 0x0091FF00, 0x0096FF00, 0x009BFF00, 0x00A0FF00, 0x00A5FF00, 0x00AAFF00, 0x00AFFF00, 0x00B4FF00,
         0x00B9FF00, 0x00BEFF00, 0x00C3FF00, 0x00C8FF00, 0x00CDFF00, 0x00D2FF00, 0x00D7FF00, 0x00DCFF00, 0x00E1FF00, 0x00E6FF00,
         0x00EBFF00, 0x00F0FF00, 0x00F5FF00, 0x00FAFF00, 0x00FFFF00, 0x00FFFA00, 0x00FFF500, 0x00FFF000, 0x00FFEB00, 0x00FFE600,
         0x00FFE100, 0x00FFDC00, 0x00FFD700, 0x00FFD200, 0x00FFCD00, 0x00FFC800, 0x00FFC300, 0x00FFBE00, 0x00FFB900, 0x00FFB400,
         0x00FFAF00, 0x00FFAA00, 0x00FFA500, 0x00FFA000, 0x00FF9B00, 0x00FF9600, 0x00FF9100, 0x00FF8C00, 0x00FF8700, 0x00FF8200,
         0x00FF7D00, 0x00FF7800, 0x00FF7300, 0x00FF6E00, 0x00FF6900, 0x00FF6400, 0x00FF5F00, 0x00FF5A00, 0x00FF5500, 0x00FF5000,
         0x00FF4B00, 0x00FF4600, 0x00FF4100, 0x00FF3C00, 0x00FF3700, 0x00FF3200, 0x00FF2D00, 0x00FF2800, 0x00FF2300, 0x00FF1E00,
         0x00FF1900, 0x00FF1400, 0x00FF0F00, 0x00FF0A00, 0x00FF0500, 0x00FF0000
         };

        //***************************************************************
        //【Form】KINECTの初期化が済んだらThreadを立ち上げる
        //***************************************************************
        public Form1()
        {
            InitializeComponent();

            //【利用可能なKINECTセンサを取得する】
            kinectSensor = (from sensorToCheck in KinectSensor.KinectSensors where sensorToCheck.Status == KinectStatus.Connected select sensorToCheck).FirstOrDefault();
            if (kinectSensor == null)
            {
                MessageBox.Show(
                   "接続可能なKINECTセンサが見当たりません。",
                   "KINECT Viewer Error Message",
                   MessageBoxButtons.OK
                );
                return;
            }

            kinectSensor.ColorStream.Enable(ColorImageFormat.RgbResolution640x480Fps30); //【ColorStream許可】
            kinectSensor.DepthStream.Enable(DepthImageFormat.Resolution320x240Fps30);    //【DepthStream許可】
            kinectSensor.SkeletonStream.Enable();                                        //【SkeltonStream許可】
            kinectSensor.Start();                                                        //【KINECT動作開始】
            kinectSensor.ColorFrameReady += ColorImageReady; //【準備完了でColorImageReadyがcallされる】
            kinectSensor.DepthFrameReady += DepthImageReady; //【準備完了でDepthImageReadyがcallされる】
            kinectSensor.AllFramesReady += new EventHandler<AllFramesReadyEventArgs>(KinectAllFramesReady);
            pixelData = new byte[kinectSensor.ColorStream.FramePixelDataLength]; //【データ受取り用】32bit
            int dfpdl = kinectSensor.DepthStream.FramePixelDataLength;
            depthData = new short[dfpdl];      //【データ受取り用】16bit
            depthFrame32 = new byte[dfpdl * 4]; //【カラー表示用】
            skeletonData = new Skeleton[kinectSensor.SkeletonStream.FrameSkeletonArrayLength];
            int cw, ch, dw, dh;
            cw = kinectSensor.ColorStream.FrameWidth;
            ch = kinectSensor.ColorStream.FrameHeight;
            dw = kinectSensor.DepthStream.FrameWidth;
            dh = kinectSensor.DepthStream.FrameHeight;
            bmp1 = new Bitmap(cw, ch,System.Drawing.Imaging.PixelFormat.Format32bppRgb ); //【ColorImage表示用】
            bmp2 = new Bitmap(dw, dh,System.Drawing.Imaging.PixelFormat.Format32bppRgb ); //【DepthImage表示用】
            rect1 = new Rectangle(0, 0, cw, ch); //【ColorImage用枠】
            rect2 = new Rectangle(0, 0, dw, dh); //【DepthImage用枠】

            kinectSensor.ElevationAngle = -10; //【KINECTセンサの上下角を-10°に設定】設定範囲±27°
            Lmax = kinectSensor.DepthStream.MaxDepth;
            Lmin = kinectSensor.DepthStream.MinDepth;
            label6.Text = "Max=" + Lmax.ToString() + "mm";
            label7.Text = "Min=" + Lmin.ToString() + "mm";

            processRun = true;                             //【Thread実行フラグ】
            processThread = new Thread(MainProcessThread); //【Main処理ループのためのThreadを定義】
            processThread.Start();                         //【Thread開始】
        }

        //***************************************************************
        //【Form終了ボタン】KINECTを停止、Thread停止要求を出してFormを閉じる
        //***************************************************************
        private void button1_Click(object sender, EventArgs e) //【終了ボタン】
        {
            processRun = false;  //【Thread実行フラグ】
            kinectSensor.Stop(); //【KINECTセンサを終了】
            kinectSensor = null; //【KINECTセンサのオブジェクトを解放する】
            this.Close();        //【Formを閉じる】
        }

        //***************************************************************
        //【上下角変更ボタン】KINECTの上下角を変更。±27°の範囲内。時間を置かないとエラーが発生する
        //***************************************************************
        private void button2_Click(object sender, EventArgs e) //【上下角変更ボタン】
        {
            Int32 angle = int.Parse(textBox1.Text); //【設定角度を読み込む】±27°
            if (angle < kinectSensor.MaxElevationAngle && angle > kinectSensor.MinElevationAngle)
            {
                kinectSensor.ElevationAngle = angle; //【上下角の変更】
            }
        }

        //***************************************************************
        //【ColorImageの取得イベント】
        //***************************************************************
        private void ColorImageReady(object sender, ColorImageFrameReadyEventArgs e)
        {
           using (imageFrame = e.OpenColorImageFrame())
           {
              if (imageFrame != null)
              {
                 imageFrame.CopyPixelDataTo(pixelData); //【KINECTのColor画像を配列pixelDataにコピーする】
                 data1 = this.bmp1.LockBits(rect1, ImageLockMode.WriteOnly, System.Drawing.Imaging.PixelFormat.Format32bppRgb); //【Lockする】
                 Marshal.Copy(pixelData, 0, data1.Scan0, pixelData.Length); //【UnmanagedMemoryのBitmapDataに配列pixelDataをコピーする】
                 bmp1.UnlockBits(data1);                         //【Lock解除】
                 if (flagFlip == 1) { bmp1.RotateFlip(RotateFlipType.Rotate180FlipY); } //【左右反転】
                 pictureBox1.Image = bmp1;                       //【pictureBox1に画像表示】
                 Graphics g = Graphics.FromImage(pictureBox1.Image);
                 SolidBrush newbrush = new SolidBrush(Color.Red);
                 for (int i = 0; i < 20; i++)
                 {
                     g.FillEllipse(newbrush, (float)pos[i].Position.X - 5f, (float)pos[i].Position.Y - 5f, 10f, 10f);
                 }
                 //【頭】【肩中央】【背骨】【尻中央】【左肩】【左肘】【左手首】【左手】【右肩】【右肘】【右手首】【右手】
                 //【左尻】【左膝】【左足首】【左足】【右尻】【右膝】【右足首】【右足】
                 g.DrawLine(new Pen(Color.Red, 3.0f), new Point((int)pix[0].X, (int)pix[0].Y), new Point((int)pix[1].X, (int)pix[1].Y));
                 g.DrawLine(new Pen(Color.Red, 3.0f), new Point((int)pix[1].X, (int)pix[1].Y), new Point((int)pix[2].X, (int)pix[2].Y));
                 g.DrawLine(new Pen(Color.Red, 3.0f), new Point((int)pix[2].X, (int)pix[2].Y), new Point((int)pix[3].X, (int)pix[3].Y));
                 g.DrawLine(new Pen(Color.Red, 3.0f), new Point((int)pix[2].X, (int)pix[2].Y), new Point((int)pix[4].X, (int)pix[4].Y));
                 g.DrawLine(new Pen(Color.Red, 3.0f), new Point((int)pix[2].X, (int)pix[2].Y), new Point((int)pix[8].X, (int)pix[8].Y));
                 g.DrawLine(new Pen(Color.Red, 3.0f), new Point((int)pix[2].X, (int)pix[2].Y), new Point((int)pix[12].X, (int)pix[12].Y));
                 g.DrawLine(new Pen(Color.Red, 3.0f), new Point((int)pix[2].X, (int)pix[2].Y), new Point((int)pix[16].X, (int)pix[16].Y));
                 g.DrawLine(new Pen(Color.Red, 3.0f), new Point((int)pix[12].X, (int)pix[12].Y), new Point((int)pix[16].X, (int)pix[16].Y));
                 g.DrawLine(new Pen(Color.Red, 3.0f), new Point((int)pix[1].X, (int)pix[1].Y), new Point((int)pix[4].X, (int)pix[4].Y));
                 g.DrawLine(new Pen(Color.Red, 3.0f), new Point((int)pix[4].X, (int)pix[4].Y), new Point((int)pix[5].X, (int)pix[5].Y));
                 g.DrawLine(new Pen(Color.Red, 3.0f), new Point((int)pix[5].X, (int)pix[5].Y), new Point((int)pix[6].X, (int)pix[6].Y));
                 g.DrawLine(new Pen(Color.Red, 3.0f), new Point((int)pix[6].X, (int)pix[6].Y), new Point((int)pix[7].X, (int)pix[7].Y));
                 g.DrawLine(new Pen(Color.Red, 3.0f), new Point((int)pix[1].X, (int)pix[1].Y), new Point((int)pix[8].X, (int)pix[8].Y));
                 g.DrawLine(new Pen(Color.Red, 3.0f), new Point((int)pix[8].X, (int)pix[8].Y), new Point((int)pix[9].X, (int)pix[9].Y));
                 g.DrawLine(new Pen(Color.Red, 3.0f), new Point((int)pix[9].X, (int)pix[9].Y), new Point((int)pix[10].X, (int)pix[10].Y));
                 g.DrawLine(new Pen(Color.Red, 3.0f), new Point((int)pix[10].X, (int)pix[10].Y), new Point((int)pix[11].X, (int)pix[11].Y));
                 g.DrawLine(new Pen(Color.Red, 3.0f), new Point((int)pix[3].X, (int)pix[3].Y), new Point((int)pix[12].X, (int)pix[12].Y));
                 g.DrawLine(new Pen(Color.Red, 3.0f), new Point((int)pix[12].X, (int)pix[12].Y), new Point((int)pix[13].X, (int)pix[13].Y));
                 g.DrawLine(new Pen(Color.Red, 3.0f), new Point((int)pix[13].X, (int)pix[13].Y), new Point((int)pix[14].X, (int)pix[14].Y));
                 g.DrawLine(new Pen(Color.Red, 3.0f), new Point((int)pix[14].X, (int)pix[14].Y), new Point((int)pix[15].X, (int)pix[15].Y));
                 g.DrawLine(new Pen(Color.Red, 3.0f), new Point((int)pix[3].X, (int)pix[3].Y), new Point((int)pix[16].X, (int)pix[16].Y));
                 g.DrawLine(new Pen(Color.Red, 3.0f), new Point((int)pix[16].X, (int)pix[16].Y), new Point((int)pix[17].X, (int)pix[17].Y));
                 g.DrawLine(new Pen(Color.Red, 3.0f), new Point((int)pix[17].X, (int)pix[17].Y), new Point((int)pix[18].X, (int)pix[18].Y));
                 g.DrawLine(new Pen(Color.Red, 3.0f), new Point((int)pix[18].X, (int)pix[18].Y), new Point((int)pix[19].X, (int)pix[19].Y));
                 g.Dispose();
              }
              else
              {
                 // imageFrame is null because the request did not arrive in time
              }
           }
        }

        //***************************************************************
        //【DepthImageの取得イベント】
        //***************************************************************
        private void DepthImageReady(object sender, DepthImageFrameReadyEventArgs e)
        {
            using (depthFrame = e.OpenDepthImageFrame())
            {
                if (depthFrame != null)
                {   int i,j,d, playerID;

                    depthFrame.CopyPixelDataTo(this.depthData);
                    j=0;
                    for(i=0; i<320*240; i++)
                    {
                       //kinectSensor.DepthStreamに以下のフラグがある。
                       // depthStream.TooNearDepth 【距離が近すぎる】
                       // depthStream.TooFarDepth  【距離が遠すぎる】
                       // depthStream.UnknownDepth 【距離が不明】
                       //【距離情報】
                        d = depthData[i];    //【上位13bitがDepth値】
                        playerID = d & bmsk; //【下位3bitはplayerID】
                        d = ((d >> bwd) & 0x1FFF);  //【realDepth】0mm~8191mm
                        if (d < Lmin) { d = Lmin; } //【近すぎる】
                        if (d > Lmax) { d = Lmax; } //【遠すぎる】
                        d = ColorLookupTable[255-(byte)((d - Lmin) * 0.079688)]; //【256色に変換】//800mm~4000mm⇒赤~白
                       depthFrame32[j] = (byte)(d & 255);         //【青】B
                       depthFrame32[j+1] = (byte)((d>>8) & 255);  //【緑】G
                       depthFrame32[j+2] = (byte)((d>>16) & 255); //【赤】R
                       depthFrame32[j+3] = 0;
                       j=j+4;
                    }
                    data2 = this.bmp2.LockBits(rect2, ImageLockMode.WriteOnly, System.Drawing.Imaging.PixelFormat.Format32bppRgb); //【Lockする】
                    Marshal.Copy(depthFrame32, 0, data2.Scan0, depthFrame32.Length); //【UnmanagedMemoryのBitmapDataに配列depthDataをコピーする】
                    bmp2.UnlockBits(data2);                         //【Lock解除】
                    if (flagFlip == 1) { bmp2.RotateFlip(RotateFlipType.Rotate180FlipY); } //【左右反転】
                    pictureBox2.Image = bmp2;                       //【pictureBox1に画像表示】
                }
                else
                {
                    // imageFrame is null because the request did not arrive in time
                }
            }
        }

        //***************************************************************
        //【SkeletonFrameの取得イベント】SkeletonFrameは6名分。各々がJointsコレクションを持つ。
        //***************************************************************
        private void KinectAllFramesReady(object sender, AllFramesReadyEventArgs e)
  {
      using (skeletonFrame = e.OpenSkeletonFrame())
      {
          if (skeletonFrame != null)
          {
              int i;
              skeletonFrame.CopySkeletonDataTo(skeletonData);
              for(i=0; i< skeletonData.Length; i++)
              {
                  if (skeletonData[i].TrackingState == SkeletonTrackingState.Tracked)
                  {
                      label8.Text = "Tracking No.=" + i.ToString();
                      pos[0].Position = skeletonData[i].Joints[JointType.Head].Position;           //【頭】
                      pos[1].Position = skeletonData[i].Joints[JointType.ShoulderCenter].Position; //【肩中央】
                      pos[2].Position = skeletonData[i].Joints[JointType.Spine].Position;          //【背骨】
                      pos[3].Position = skeletonData[i].Joints[JointType.HipCenter].Position;      //【尻中央】
                      pos[4].Position = skeletonData[i].Joints[JointType.ShoulderLeft].Position;   //【左肩】
                      pos[5].Position = skeletonData[i].Joints[JointType.ElbowLeft].Position;      //【左肘】
                      pos[6].Position = skeletonData[i].Joints[JointType.WristLeft].Position;      //【左手首】
                      pos[7].Position = skeletonData[i].Joints[JointType.HandLeft].Position;       //【左手】
                      pos[8].Position = skeletonData[i].Joints[JointType.ShoulderRight].Position;  //【右肩】
                      pos[9].Position = skeletonData[i].Joints[JointType.ElbowRight].Position;     //【右肘】
                      pos[10].Position = skeletonData[i].Joints[JointType.WristRight].Position;    //【右手首】
                      pos[11].Position = skeletonData[i].Joints[JointType.HandRight].Position;     //【右手】
                      pos[12].Position = skeletonData[i].Joints[JointType.HipLeft].Position;       //【左尻】
                      pos[13].Position = skeletonData[i].Joints[JointType.KneeLeft].Position;      //【左膝】
                      pos[14].Position = skeletonData[i].Joints[JointType.AnkleLeft].Position;     //【左足首】
                      pos[15].Position = skeletonData[i].Joints[JointType.FootLeft].Position;      //【左足】
                      pos[16].Position = skeletonData[i].Joints[JointType.HipRight].Position;      //【右尻】
                      pos[17].Position = skeletonData[i].Joints[JointType.KneeRight].Position;     //【右膝】
                      pos[18].Position = skeletonData[i].Joints[JointType.AnkleRight].Position;    //【右足首】
                      pos[19].Position = skeletonData[i].Joints[JointType.FootRight].Position;     //【右足】
                      break;
                  }
              }
              if(i==7) {label8.Text = "Lost";}
              float Xmin=(+9.0f); //ここのXmin,Xmax,Ymin,Ymaxは不必要です。
              float Xmax=(-9.0f); //ちょっと訳がわからなかったので調べるのに使った残骸です。
              float Ymin=(+9.0f);
              float Ymax=(-9.0f);
              for (i = 0; i < 20; i++)
              {
                  pix[i]=kinectSensor.MapSkeletonPointToColor(pos[i].Position, ColorImageFormat.RgbResolution640x480Fps30);
                  if (flagFlip == 1) { pix[i].X = 640 - pix[i].X; }
                  if (pos[i].Position.X > Xmax) { Xmax = pos[i].Position.X; }
                  if (pos[i].Position.X < Xmin) { Xmin = pos[i].Position.X; }
                  if (pos[i].Position.Y > Ymax) { Ymax = pos[i].Position.Y; }
                  if (pos[i].Position.Y < Ymin) { Ymin = pos[i].Position.Y; }
              }
              label9.Text = "Xmin=" + Xmin.ToString();
              label10.Text = "Xmax=" + Xmax.ToString();
              label11.Text = "Ymin=" + Ymin.ToString();
              label12.Text = "Ymax=" + Ymax.ToString();
          }
          else
          {
              // skeletonFrame is null because the request did not arrive in time
          }
      }
  }

        //***************************************************************
        //【拡張現実センサ用のThread】
        //***************************************************************
        private unsafe void MainProcessThread()
        {
            while (processRun)
            {

            }
        }

    }
}
|
|
 |
|
【各種拡張現実センサの開発】
どちらかと言うと、専用センサを開発するのがメインで、拡張現実センサの機能を付加しているという程度です。 |
|