|
|
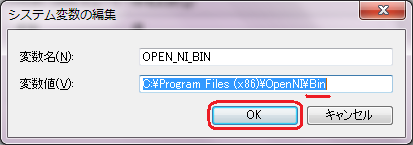
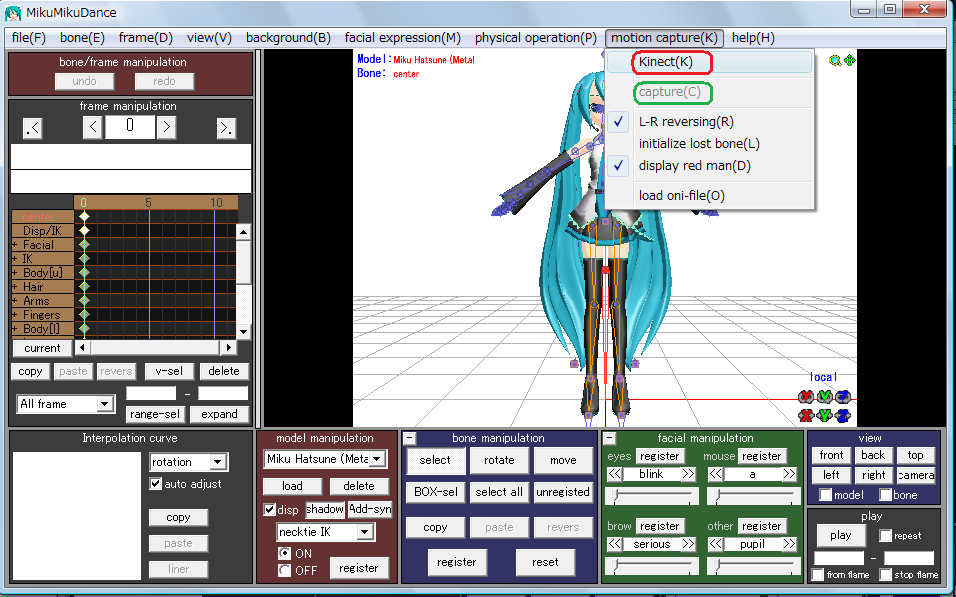
8-1.As shown in the above section, create 3 text files on your Desktop by using notepad.exe. And copy Sample-Scene.xml, Sample-Tracking.xml and Sample-User.xml into 『C:\Program Files (x86)\PrimeSense\NITE\Data』 folder.
『Sample-Scene.xml』
<OpenNI>
<Licenses>
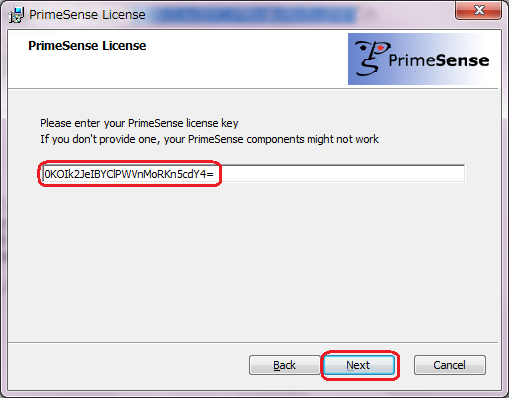
<License vendor="PrimeSense" key="0KOIk2JeIBYClPWVnMoRKn5cdY4="/>
</Licenses>
<Log writeToConsole="true" writeToFile="false">
<!-- 0 - Verbose, 1 - Info, 2 - Warning, 3 - Error (default) -->
<LogLevel value="3"/>
<Masks>
<Mask name="ALL" on="false"/>
</Masks>
<Dumps>
</Dumps>
</Log>
<ProductionNodes>
<Node type="Depth">
<Configuration>
<Mirror on="true"/>
</Configuration>
</Node>
<Node type="Scene" />
</ProductionNodes>
</OpenNI>
『Sample-Tracking.xml』
<OpenNI>
	<Licenses>
		<License vendor="PrimeSense" key="0KOIk2JeIBYClPWVnMoRKn5cdY4="/>
	</Licenses>
	<Log writeToConsole="true" writeToFile="false">
		<!-- 0 - Verbose, 1 - Info, 2 - Warning, 3 - Error (default) -->
		<LogLevel value="3"/>
		<Masks>
			<Mask name="ALL" on="false"/>
		</Masks>
		<Dumps>
		</Dumps>
	</Log>
	<ProductionNodes>
		<Node type="Depth">
			<Configuration>
				<Mirror on="true"/>
			</Configuration>
		</Node>
		<Node type="Gesture" />
		<Node type="Hands" />
	</ProductionNodes>
</OpenNI>
『Sample-User.xml』
<OpenNI>
	<Licenses>
		<License vendor="PrimeSense" key="0KOIk2JeIBYClPWVnMoRKn5cdY4="/>
	</Licenses>
	<Log writeToConsole="true" writeToFile="false">
		<!-- 0 - Verbose, 1 - Info, 2 - Warning, 3 - Error (default) -->
		<LogLevel value="3"/>
		<Masks>
			<Mask name="ALL" on="false"/>
		</Masks>
		<Dumps>
		</Dumps>
	</Log>
	<ProductionNodes>
		<Node type="Depth">
			<Configuration>
				<Mirror on="true"/>
			</Configuration>
		</Node>
		<Node type="User" />
	</ProductionNodes>
</OpenNI>
|


 ⇒
⇒ ⇒
⇒